> ## Documentation Index
> Fetch the complete documentation index at: https://docs.cloud.coinbase.com/llms.txt
> Use this file to discover all available pages before exploring further.
# Test with Postman
The following Postman collection file is available for download.
* Coinbase Business Checkouts Collection
* Coinbase Developer Platform Postman Environment
This collection includes example payloads and automatic JWT token generation for authenticated requests.
## Prerequisites
Before using this collection, ensure you have:
* Coinbase Business account
* [CDP API key](/coinbase-business/introduction/get-started#creating-api-keys) using **ECDSA** signature algorithm
* Downloaded the following files (we will use these to setup Postman):
* **Checkouts collection**: Pre-configured API requests for creating, listing, and managing checkouts
* **Environment configuration**: Authentication setup and variables for CDP API access
**Recommended**: Use ECDSA keys for reliable testing with this Postman collection. While the Checkouts API itself supports both ECDSA and Ed25519 keys, ECDSA provides the most consistent experience in Postman.
The Checkouts API uses the same authentication environment as other Coinbase Business APIs. You can reuse the Coinbase Developer Platform environment file.
## 1. Setup Postman
Use [Postman Web](https://www.postman.com/) to sign in (no installation needed).
Download from [Postman Downloads](https://www.postman.com/downloads/) if you prefer a native app
Once you are logged into Postman, you can import the files into your workspace through the web interface.
Under "Get Started", click on **Import APIs and collections**.
If you already have a Postman workspace, you can select **Import** in the upper-left corner of the screen.
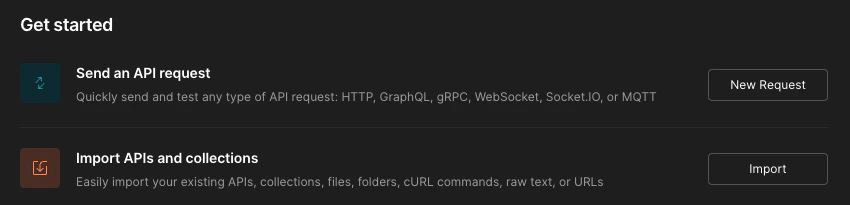 Select both JSON files you downloaded and import them into your Postman workspace.
## 2. Configure your environment
Set up authentication by adding your CDP API key details to Postman.
In the left sidebar, click on **Environments**. Select the **Coinbase Developer Platform Postman Environment** option to see your environment variables.
Select both JSON files you downloaded and import them into your Postman workspace.
## 2. Configure your environment
Set up authentication by adding your CDP API key details to Postman.
In the left sidebar, click on **Environments**. Select the **Coinbase Developer Platform Postman Environment** option to see your environment variables.
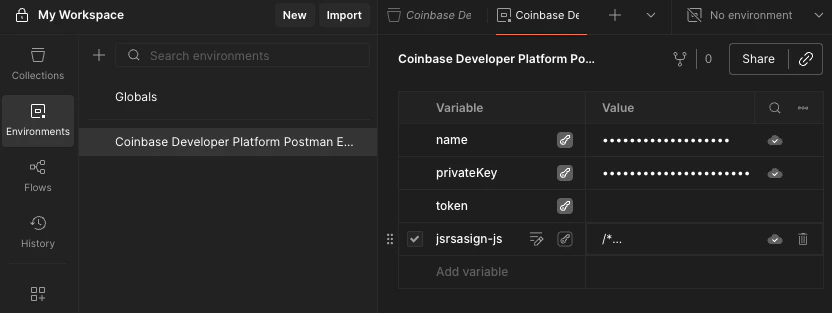 Add these two variables exactly as shown:
| Variable | Value | Where to find it |
| ------------ | ------------------------------------ | -------------------------------------------------------- |
| `name` | Your full API key name (with quotes) | From the JSON file downloaded when creating your API key |
| `privateKey` | Your ECDSA private key (with quotes) | From the JSON file downloaded when creating your API key |
**Example environment variable values:**
```
name: "organizations/12345678-1234-5678-1234-567812345678/apiKeys/abcdef12-3456-7890-abcd-ef1234567890"
privateKey: "-----BEGIN EC PRIVATE KEY-----\nMHcCAQEEIJ8VsC2ifqfxDpq7mnVWdBKnqIRjFFg0zcC9U4RgKHQqoAoGCCqGSM49\nAwEHoUQDQgAEX7M5LCPd6rkeUxIK3/B9+2+3RQFvkEfMU4iN1ABm5VNUqNmRnJv4\nCxcdPIKreo4xuNr2S8Y5SU6IELb8HGc8Ow==\n-----END EC PRIVATE KEY-----\n"
```
**Important:**
* Include the quotes as part of the value
* Keep the privateKey on one line with `\n` for line breaks
* Use an ECDSA key (starts with `-----BEGIN EC PRIVATE KEY-----`)
## 3. Authenticate and test endpoints
The Postman collection automatically generates a JWT token before each request using your environment variables.
Navigate to the **Collections** tab in Postman and expand the "Coinbase Business Checkouts Collection" we added earlier.
From the **Environment** dropdown in the upper-right corner, select the **Coinbase Developer Platform Postman Environment** we just configured.
Add these two variables exactly as shown:
| Variable | Value | Where to find it |
| ------------ | ------------------------------------ | -------------------------------------------------------- |
| `name` | Your full API key name (with quotes) | From the JSON file downloaded when creating your API key |
| `privateKey` | Your ECDSA private key (with quotes) | From the JSON file downloaded when creating your API key |
**Example environment variable values:**
```
name: "organizations/12345678-1234-5678-1234-567812345678/apiKeys/abcdef12-3456-7890-abcd-ef1234567890"
privateKey: "-----BEGIN EC PRIVATE KEY-----\nMHcCAQEEIJ8VsC2ifqfxDpq7mnVWdBKnqIRjFFg0zcC9U4RgKHQqoAoGCCqGSM49\nAwEHoUQDQgAEX7M5LCPd6rkeUxIK3/B9+2+3RQFvkEfMU4iN1ABm5VNUqNmRnJv4\nCxcdPIKreo4xuNr2S8Y5SU6IELb8HGc8Ow==\n-----END EC PRIVATE KEY-----\n"
```
**Important:**
* Include the quotes as part of the value
* Keep the privateKey on one line with `\n` for line breaks
* Use an ECDSA key (starts with `-----BEGIN EC PRIVATE KEY-----`)
## 3. Authenticate and test endpoints
The Postman collection automatically generates a JWT token before each request using your environment variables.
Navigate to the **Collections** tab in Postman and expand the "Coinbase Business Checkouts Collection" we added earlier.
From the **Environment** dropdown in the upper-right corner, select the **Coinbase Developer Platform Postman Environment** we just configured.
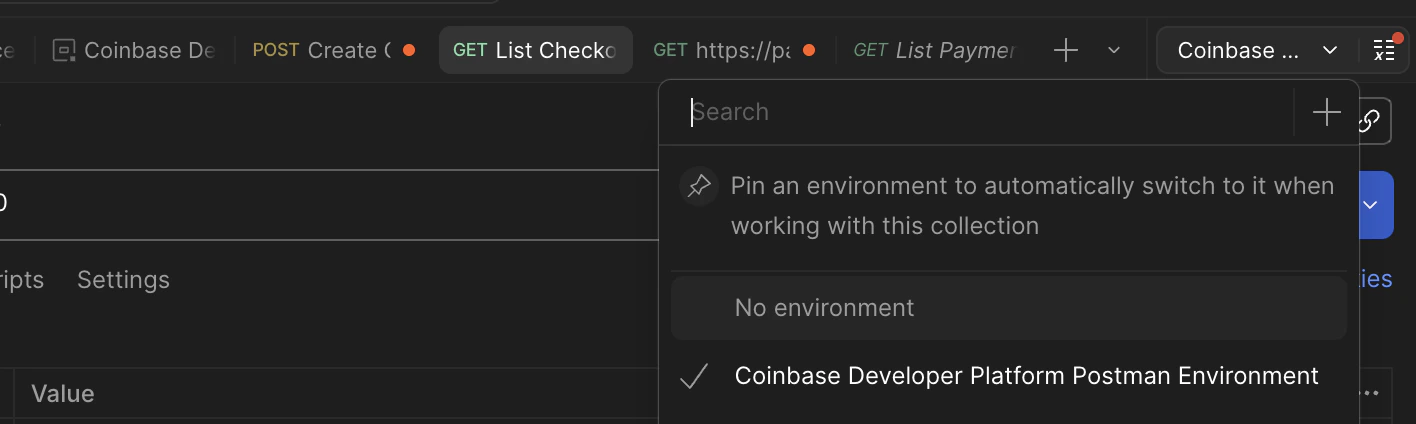 Start with the **List Checkouts** request and click the **Send** button.
You should receive a response similar to the following:
```console theme={null}
{
"checkouts": []
}
```
1. Select the **Create Checkout** request
2. Review the pre-filled request body (you can modify amounts, description, etc.)
3. Click **Send**
4. Copy the `url` from the response - this is your checkout URL!
## Available endpoints
The Checkouts collection includes the following endpoints:
* **Create Checkout** - Creates a new checkout for accepting cryptocurrency payments
* **List Checkouts** - Retrieves a paginated list of checkouts with optional filtering
* **Get Checkout** - Retrieves details of a specific checkout by ID
* **Deactivate Checkout** - Deactivates a checkout to prevent further payments
* **Refund Checkout** - Initiates a full or partial refund for a completed checkout
## Troubleshooting
**Confirm Environment**
Make sure the correct environment is selected by checking the check mark to the right of the environment name in Postman.
### Common issues and solutions
| Issue | Solution |
| ------------------------------------ | -------------------------------------------------------------- |
| Using Ed25519 key instead of ECDSA | Use ECDSA key - starts with `-----BEGIN EC PRIVATE KEY-----` |
| Missing quotes in environment values | Include quotes around `name` and `privateKey` values |
| Invalid JSON | Check the environment dropdown is set to your CDP environment |
| 401 Unauthorized errors | Check JWT generation in Postman Console and verify credentials |
### Need additional help?
* **Documentation**: Review the [Authentication Guide](/coinbase-business/authentication-authorization/api-key-authentication)
* **Community**: Join the [CDP Discord](https://discord.com/invite/cdp) for support
* **Support**: Contact Coinbase Business support with your `X-Request-Id` from failed requests
## What to read next
* [Checkouts API Reference](/api-reference/business-api/rest-api/checkouts/introduction) - Detailed API documentation with all request/response schemas
* [Authentication Guide](/coinbase-business/authentication-authorization/api-key-authentication) - Learn more about CDP API key authentication
* [Getting Started Guide](/coinbase-business/introduction/get-started) - Set up your Coinbase Business account and create API keys
* [Migrate from Payment Links](/coinbase-business/checkout-apis/migrate/overview) - If you're moving from the Payment Links API
Start with the **List Checkouts** request and click the **Send** button.
You should receive a response similar to the following:
```console theme={null}
{
"checkouts": []
}
```
1. Select the **Create Checkout** request
2. Review the pre-filled request body (you can modify amounts, description, etc.)
3. Click **Send**
4. Copy the `url` from the response - this is your checkout URL!
## Available endpoints
The Checkouts collection includes the following endpoints:
* **Create Checkout** - Creates a new checkout for accepting cryptocurrency payments
* **List Checkouts** - Retrieves a paginated list of checkouts with optional filtering
* **Get Checkout** - Retrieves details of a specific checkout by ID
* **Deactivate Checkout** - Deactivates a checkout to prevent further payments
* **Refund Checkout** - Initiates a full or partial refund for a completed checkout
## Troubleshooting
**Confirm Environment**
Make sure the correct environment is selected by checking the check mark to the right of the environment name in Postman.
### Common issues and solutions
| Issue | Solution |
| ------------------------------------ | -------------------------------------------------------------- |
| Using Ed25519 key instead of ECDSA | Use ECDSA key - starts with `-----BEGIN EC PRIVATE KEY-----` |
| Missing quotes in environment values | Include quotes around `name` and `privateKey` values |
| Invalid JSON | Check the environment dropdown is set to your CDP environment |
| 401 Unauthorized errors | Check JWT generation in Postman Console and verify credentials |
### Need additional help?
* **Documentation**: Review the [Authentication Guide](/coinbase-business/authentication-authorization/api-key-authentication)
* **Community**: Join the [CDP Discord](https://discord.com/invite/cdp) for support
* **Support**: Contact Coinbase Business support with your `X-Request-Id` from failed requests
## What to read next
* [Checkouts API Reference](/api-reference/business-api/rest-api/checkouts/introduction) - Detailed API documentation with all request/response schemas
* [Authentication Guide](/coinbase-business/authentication-authorization/api-key-authentication) - Learn more about CDP API key authentication
* [Getting Started Guide](/coinbase-business/introduction/get-started) - Set up your Coinbase Business account and create API keys
* [Migrate from Payment Links](/coinbase-business/checkout-apis/migrate/overview) - If you're moving from the Payment Links API